Using Nginx as reverse proxy with Docker & Node.js
- Sachin Tah

- Dec 30, 2020
- 9 min read

Nginx is a web server that is often used as a reverse proxy. A reverse proxy sits in front of web servers and acts as a middleman between client and webserver to perform various tasks.
This is how a typical reverse proxy architecture looks like
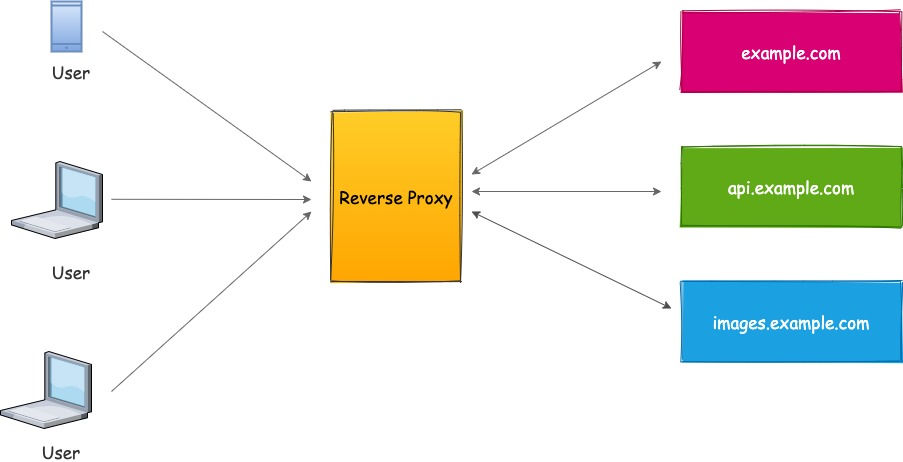
User requests are received by a reverse proxy and routed to relevant servers. But, why do we need a reverse proxy? what are the benefits of reverse proxy? Well reverse proxy comes with a substantial amount of benefits, here are some of them
Load Balancing - A reverse proxy can act as a load balancer which helps in distributing user load to underlying servers as per LB policy
API Gateway - Reverse proxy like Nginx can also be used as API gateway for your underlying Microservices.
Security - If you look at the above diagram, reverse proxy abstracts underlying server or servers which makes it difficult for an attacker to perform malicious operations on the origin server. It is difficult to guess which server is serving requests. You can also have the same server hosting multiple applications on different ports.
Caching - Yes a reverse proxy can also cache contents and therefore saves server trips in order to serve contents to the user.
SSL - Instead of implementing SSL on different application and servers, you can install your certificates on a reverse proxy server only, eventually saving efforts and cost
Single IP Mapping - One of the major advantages which I see in using a reverse proxy is that of using one IP address that gets mapped to different domains on your DNS server. This saves time and sometimes costs if you are planning to use one server to host multiple applications on different ports.
Now let us focus on our original topic, which was configuring node.js application on docker and Nginx. For ease of implementation, we will be using a single machine with different port numbers to deploy our node.js applications. You can use the same configuration to host multiple applications on a different web server. We will be implementing the below architecture in this article
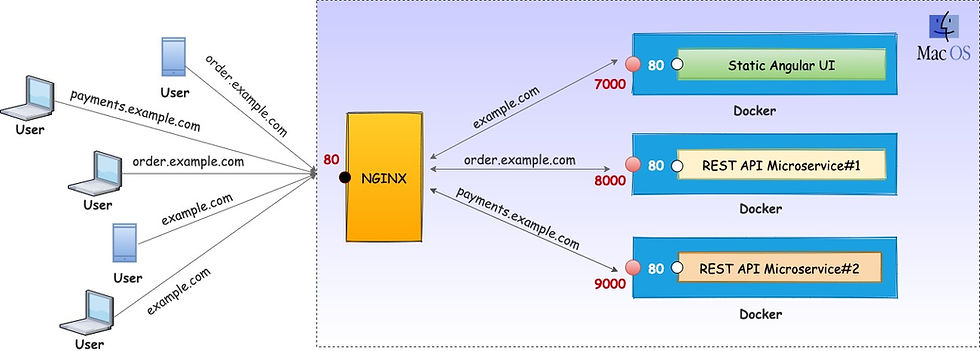
Here are the highlights of the above architecture
We have a Node.js application responsible for returning static contents for a typical angular SPA application. When you want to host a compiled version of your Angular application, you need a web server that will serve the static angular files to the user browser, simple webserver written in node can be of use in such a scenario
REST API application developed in Node.js, for example, this can be an Order Microservice responsible for processing new orders
One more REST API application developed using Node.js, for example, Payment Microservice responsible for processing payments
All of these three applications run on PORT 80 inside different Docker containers. These docker containers expose port 7000, 8000, and 9000 respectively for each of this three application
NGINX server running on the same or different server responsible for rerouting the request to individual applications running on port 7000, 8000 and 9000
NGINX server receives all requests on PORT 80
To replicate the above architecture on local Mac OS, we will modify the mac host file to mimic the behavior of a DNS server and will be writing simple Node.js applications. We will also be running all three applications on a single machine. You can do the same on Windows as well.
Implementing Static Node.js Webserver (example.com)
Overall we will be creating the following three node.js applications
Static Server - Responsible for serving static contents. Again, a typical use case could be serving compiled angular js files to a web browser
Order API Server - Order microservice implemented as REST API using node.js. These services will be consumed from angular SPA application
Payment API Server - Transaction microservice implemented as REST API using node.js and will be consumed from angular SPA application
Implementing a web server using Node.js is super easy, let us start by creating our first static web application.
Create folder staticserver and open a terminal window and go to the root of this folder. We will create a package.json file using the below command
npm init
This command will walk you through creating a package.json file for your application, enter details like the package name, version, etc. and the following file will be created
{
   "name": "staticserver",
   "version": "1.0.0",
   "description": "Node.js server responsible for serving static
   contents",
   "main": "server.js",
   "dependencies": {},
   "devDependencies": {},
   "scripts": {
     "test": "echo \"Error: no test specified\" && exit 1"
    },
   "author": "Sachin Tah",
   "license": "ISC"
 }
This is the file which we will be using to deploy our node.js application on the target environment, be it a normal server or a docker container. In order to create a webserver that will serve static contents, we will be using the Express package. To install express use the following command
npm install express --save
This will install express as a local package and also save the details in your package.json file. Your dependency section of package.json will have an entry like this
  "dependencies": {
      "express": "^4.17.1"
  },
Now create server.js file at the root of staticserver folder which will be the starting point of our webserver.
Add the following lines of code
'use strict';
const express = require('express');
const PORT = 80;
const HOST = '0.0.0.0';

//Create Express Application
const app = express();
//Server All Static Contents from Static Folder
app.use('/', express.static('./static'));

//Start Your WebServer & Listen on PORT 80
app.listen(PORT, HOST);
console.log('~.~.~.~ Static Server Running on Port 80 ~.~.~.~');
The code is self-explanatory, just note that all the static contents are served from a static folder which is at the root of your application, I have placed a simple HTML file name index.html at the root.
Now run your application using the following command
node server.js
This will start your server at port 80 which is serving static contents, you can check if this is working by going to your browser and type http://localhost/, your browser should display index.html page present in the root of your static folder.
Dockerizing Node Application
We have created our node.js web server responsible for serving static contents. Let us try to host this application inside a docker container. We will start by first creating the contents of our docker image.
Create a file Dockerfile in the root of your application and add the following lines to
# Use base image of node available on Docker Hub
FROM node:12

# Create working directory inside your container which will hold our source code
WORKDIR /usr/src/app

# Copy Package.json file which will be used to install App dependencies inside the container
COPY package*.json ./

# Run npm install to install all dependencies inside docker container
RUN npm install

# Copy application source code to /usr/src/app folder
COPY . .

#Expose port 7000 on your container
EXPOSE 7000

# Run your node application inside your container
CMD [ "node", "server.js" ]
We have some additional files in the root folder, like node_modules and npm-debug.log which we do not want docker to copy using COPY . . command. Therefore to avoid this we will create a .dockerignore file in the root and add these two file names
node_modules
npm-debug.log
Docker will ignore these two files when it will copy contents from the root of the development folder /staticserver/ to the container /usr/src/app folder.
Now your Dockerfile is ready, its time to build your docker image. Run the following command at the root of your staticserver folder
docker build -t staticserver .
This command will build your docker image using step by step instructions provided in Dockerfile file. If you have DockerDesktop install, you will be able to see a new entry under the images section. We have tagged this image using -t argument
It's time to run your container image using the following command. Since we have our node.js application running on port 80 inside our docker container and we have exposed port 7000 of our container, we need to tell docker to route all requests coming on container external port 7000 to port 80.
docker run -d -p 7000:80 --name staticserver -it staticserver
This will run our docker image staticserver.
You can go to the browser and type URL http://localhost:7000/, this will display the contents of your static index.html page. You can stop your original node application running on port 80 as this application is running inside a docker container.
Implementing REST API Node.js Webservers
Let us try to implement a simple REST API Server emulating order.example.com microservice and payments.example.com microservice
Let us start by creating orderserver folder and performing the same steps as explained above for creating static server,
Create package.json file using npm init
Install express using npm install command
Create server.js file and add the following lines of code
'use strict';
const express = require('express');
const PORT = 80;
const HOST = '0.0.0.0';

//Create Express Application
const app = express();

//Server All Static Contents from Static Folder
app.get('/', function(req,res){
 res.status(200).send({"message" : "Order REST API Microservice Running", "status": "success"})
 res.end;
});
app.post('/createorder', function(req,res){
 res.status(200).send({"status": "success", "message" : "Order Created"})
 res.end;
});

//Start Your WebServer & Listen on PORT 80
app.listen(PORT, HOST);
console.log('~.~.~.~ Order Microservice Running on Port 80 ~.~.~.~');
Next, create docker file and .dockerignore file
# Use base image of node available on Docker Hub
FROM node:12

# Create working directory inside your container which will hold our source code
WORKDIR /usr/src/app

# Copy Package.json file which will be used to install App dependencies inside the container
COPY package*.json ./

# Run npm install to install all dependencies inside docker container
RUN npm install

# Copy application source code to /usr/src/app folder
COPY . .

#Expose port 8000 on your container
EXPOSE 8000

# Run your node application inside your container
CMD [ "node", "server.js" ]
Run docker build and run commands mapping port 8000 to 80.
docker build -t orderserver .
docker run -d -p 8000:80 --name orderserver -it orderserver
Similar create paymentserver folder and create node.js microservice with above instructions and below code
'use strict';
const express = require('express');
const PORT = 80;
const HOST = '0.0.0.0';

//Create Express Application
const app = express();

//Server All Static Contents from Static Folder
app.get('/', function(req,res){
 res.status(200).send({"message" : "Payments REST API Microservice Running", "status": "success"})
 res.end;
});
app.post('/processpayment', function(req,res){
 res.status(200).send({"status": "success", "message" : "Payment Processed"})
 res.end;
});

//Start Your WebServer & Listen on PORT 80
app.listen(PORT, HOST);
console.log('~.~.~.~ Payment Microservice Running on Port 80 ~.~.~.~');
Create Dockerfile and dockerignore file and add below contents to Dockerfile.
# Use base image of node available on Docker Hub
FROM node:12

# Create working directory inside your container which will hold our source code
WORKDIR /usr/src/app

# Copy Package.json file which will be used to install App dependencies inside the container
COPY package*.json ./

# Run npm install to install all dependencies inside docker container
RUN npm install

# Copy application source code to /usr/src/app folder
COPY . .

#Expose port 9000 on your container
EXPOSE 9000

# Run your node application inside your container
CMD [ "node", "server.js" ]
Run docker build and run commands to run your container mapping port 9000 to 80.
docker build -t paymentserver .
docker run -d -p 9000:80 --name paymentserver -it paymentserver
Open your Docker desktop, you should be able to see something like this under the Containers tab.

Now you have three docker containers running three node.js applications inside it. We have opened and mapped docker port 7000, 8000 and 9000 for staticserver, orderserver and paymentserver respectively.
Let us test all three services in the browser window, open your browser and one by one type http://localhost:7000 , http://localhost:8000 , http://localhost:9000 You should be able to see the following response in your browser


Configuring NGINX
We have three running docker images each hosting different applications, its time to place an NGINX reverse proxy in front of them. If you are using Mac OS you can install NGINX using the brew command
brew install nginx
Before we configure NGINX, let us make some changes to the host file in order to mimic a DNS server locally.
On a mac, this can be done by issue the following command at the terminal window
sudo nano /etc/hosts
Add the following lines of code to your host file
127.0.0.1 example.com
127.0.0.1 order.example.com
127.0.0.1 payments.example.com
Save the changes by pressing ctr + x on mac.
Above lines will tell the browser to display contents from localserver port 80 if the user enters anyone of the above domain in the browser window. Now we have three domains pointing to the same server and port (by default 80), we can place a reverse proxy that can reroute the request to appropriate docker containers hosting the above sites.
In order to do so open NGINX configuration file by running the following command at a terminal window
nano /usr/local/etc/nginx/nginx.conf
This will open nginx.conf file which we need to modify to tell NGINX how to route requests.
For this under http section, we will add three server sections, one for each of our running servers.
For Static Contents
    server {
	    listen       80;
        server_name  example.com;
        root         /Users/sachintah/Documents/Data/Docker/source/staticserver;
        proxy_pass_request_headers on;

        location / {
                proxy_pass http://127.0.0.1:7000;
                proxy_http_version 1.1;
                proxy_pass_request_headers on;
                 }
        }
For Order Server
    server {
	    listen       80;
        server_name  order.example.com;
        root         /Users/sachintah/Documents/Data/Docker/source/orderservice;
        proxy_pass_request_headers on;

        location / {
                proxy_pass http://127.0.0.1:8000;
                proxy_http_version 1.1;
                proxy_pass_request_headers on;
                 }
        }
For Payment Server
    server {
	    listen       80;
        server_name  payments.example.com;
        root         /Users/sachintah/Documents/Data/Docker/source/paymentsservice;
        proxy_pass_request_headers on;

        location / {
                proxy_pass http://127.0.0.1:9000;
                proxy_http_version 1.1;
                proxy_pass_request_headers on;
                 }
        }
We have configured NGINX to listen to port 80 and depending upon server DNS, route application to containers running on port 7000, 8000, and 9000 respectively.
Save your configuration file and restart your NGINX, on mac you can do this using the command
sudo nginx -s stop && sudo nginx
It's time to see if our configuration works well or not.
Open the browser and type the following URLs one by one
http://example.com,
http://order.example.com
http://payments.example.com
You should be able to see the same browser output as shown above using container URLs.
That's it, we have configured a reverse proxy along with docker and node.js. This configuration works well on any OS with slight changes in configuring host and Nginx files. You can also use the same technique to host containers on different virtual or physical servers instead of a single one.
In practice we will be having three different servers hosting three containers and applications inside them, these servers will whitelist only the IP address of the server hosting reverse proxy and therefore disallowing direct access to outsiders.
I hope you have enjoyed this hands-on exercise, I am attaching source code (without node_modules) for reference, you need to run npm install for each project before you can run the same.
Happy Reading...


Comments